Friday, June 23, 2023

Post 41: First Stringing It

   I have been trying to decide for a while how exactly to design the tuners. There are basically two options with a headless guitar:

            1)  Thread the string thru a hole at the head and have a screw on the tuner to secure the string.

           2)   Thread the string thru a hole in the tuner and attach it with a screw at the head.

    My original intention was to go with #1, and I made several possible tuner heads.  But the idea of the head simply having 7 holes instead of an anchoring block sounded attractive, so I made a tuner with a screw to attach the string just to see.  The basic brass blanks I cut for the tuners can be fashioned either way once I finally make up my mind:


    I also worked on the bridge unit: cut an ebony base plate, cut out a rectangular notch for the 
wide piezo flat sensor, attached it with two brass screws to the guitar top, finished shaping and polishing the two brass side pieces, cut  a wider strip of ebony to fit the sensor, and glued the two brass strips to the base plate with cyanoacrylate glue. 

     I then made a bone blank for the nut, drilled a hole at the head, and strung the middle string for a test.  


          I wrapped the other end of the string around a screw in the tuner head, tightened it, and stretched the string. It worked. 

          The following picture shows a close-up of both the bridge and the tuner. There will be a bone strip inlaid in the ebony to hold the strings, and since that strip is wide, I want to come up with a way to adjust the intonation using seven separate adjustable bridges.  There are several ways to do that: cutting 3 long parallel grooves in the ebony to fit thin bone strips or cutting seven dovetail grooves where matching bone bridges can slide for finer adjustment.

       The string is too high both at the nut and the bridge and I will work on that later. But first, I wanted to know if the piezo worked and what the sound was like, so I connected it to my big amp thru a preamp and was pretty satisfied. For a reason I cannot understand yet, the sound is soft when the string is plucked down, but much sharper when the string is plucked up. I can only guess it has to do with the fairly sharp angle of the bridge in relation to the strings.


Saturday, June 10, 2023

Post 40: Finishing the fretboard

    I worked on the fretboard for the last couple of days, deepening and widening the cuts for the frets, first using the very thin saw I started the slot with , then a slightly wider blade Japanese saw, and finally with my "proper" fretboard saw. There is no depth gauge on the saw, so I just draw a line on the blade with a black Sharpie about 3/32" from the teeth. 

    I then make sure the depth of the cut is sufficient using a section of fret wire on which I sanded off the barbs of the kerf.  The frets are cut slightly too long and then hammered in with the mallet on the anvil. I didn't use any glue, I believe the ebony is hard enough to hold them. I hammer the edges especially hard, and then bend them in some more and blunt them with a small brass hammer. 

     Fingers crossed!

        After sanding the ends of the frets and rounding them with a fret file, it is actually beginning to look pretty good, with the large brass dots matching the fret color:

         I will do some more filing and sanding, till it is as smooth and "perfect" as I can achieve with my limited skills and tools. I still need to check the frets are level, try to get them level with the mallet, and possibly sand them level if absolutely necessary.

Thursday, June 8, 2023

Post 39: Sanding the fretboard, AGAIN

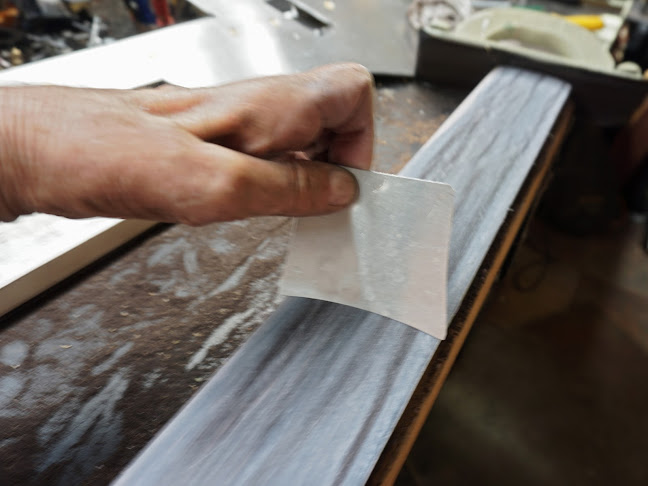
     Well, I was not satisfied with the fretboard. The 13" radius was fairly constant all the way down, but it wasn't perfectly flat. The ebony board has a slight curve and some flexibility, so I drilled 3 holes in the fretboard where dots will go and screwed it to a flat piece of 2x2. I used a perfectly straight board of padouk as a flat base for a long strip of 80-grit sandpaper I attached with double-stick tape.  I could clearly see the shiny low spots as soon as I started sanding the fretboard:


      I kept sanding till all the shiny spots disappeared. The resulting fretboard has a radius varying from 13" at the nut to about 15 or 16 at the other end. It is actually a good thing as that will allow for a flatter bridge. It's now time to place the dots and sand them down level with the fretboard.

     Speaking of the bridge, it will need to be quite low, so I plan to recess the two piezo sticks into the 1/8" aluminum top, cutting a slot in it and adding a small 1/8" aluminum plate on the backside. That will require taking the built apart and making a small notch in the through neck. 

    I will also cut a back panel for the body to match the front panel and attach it when I reassemble the body, including the pickup.

Tuesday, June 6, 2023

Post 38: Neck stiffener, fingerboard

      Well, I found a third option and used a piece of U-channel aluminum I had as a stiffener for the neck where the cutout for the pickup weakened it. The 2" brass screws I got, because that was all they had, came in handy to bolt the reinforcement on.  I had to cut down the channel at an angle for them to be long enough. In fact, they are long enough to add a 1/8" aluminum back panel to the guitar later.

      I went to Woodcraft yesterday to look for a nice piece of wood to use as a fingerboard, and ran across a  slab of woof I fell in love with.  At 14 board-foot, it was expensive, but I asked and got a nice discount.  I have been toying for a while with the idea to make a wooden electric bass, and this 16" x 8ft slab of Canari Wood is big enough to cut 3 guitars out of:


      It still has some bark on it, and I love the white outer wood and the colorful orange and yellow sshades of the heartwood. 


       I can visualize gluing two pieces together so a white stripe runs through the center of the guitar body and cutting a Stasi-inspired mini bass out of it:


          But that is for another post. In the meantime, I cut and shaped a piece of ebony from Woodcraft for the fingerboard with an 13" radius.  In order to get the proper radius, I used an aluminum template to scrape chalk I had rubbed on off the fingerboard to show high points and so sanded them down progressively. 


       Before I was quite there,  I marked it and slotted it for frets. The last time I did that for the lap steel, I used a miter box because the frets were straight. But the frets are slanted on this one, with a scale varying from 732mm to 768mm. So I just marked each fret end as precisely as I could with a knife mark, scored a deep fret line with a knife, and followed it with a thin fret saw:


          Here is how it looks on the baritone body with the black 7-string headless guitar locking nut and the piezo bridge roughly in place. I will use a thin piece of ebony as a spacer under the bridge instead of the oval piece of aluminum :

Thursday, June 1, 2023

Post 37: Cutout for magnetic pickup, bent tuners plate

     Today I cut out the hole in the front plate to fit the magnetic pickup and notched the neck tube to fit it in. 

       I also bent the part of the front plate where the tuners will be attached. I then cut an oval aluminum plate to fit around the bridge pieces. It looks like the tuners could be moved closer to the bridge, within the body shape. The wooden bridge will have to be flattened and raised to match the aluminum fingerboard.

     I tested the flexibility of the neck and there seems to be some give, probably because the notch for the pickup ended up deeper than expected. There are two possible options: add square tubing sections bolted on each side of the notch in the neck to stiffen it. The other is to install two truss rods.


Post 34: Thinking of a headless and fretless bass

   I would like to use that wonderful piece of canari wood to try my hand at making a more traditional wooden bass. I want it to be special ...